
Resize an Azure SQL Database with Powershell – Part 2
This post might contain affiliate links. We may earn a commission if you click and make a purchase. Your support is appreciated!
In the first part of my Azure SQL Database Powershell Automation series I showed how to create the resource group, the logical SQL Server and the corresponding database, I would like to show you how to implement a resize of the performance level of this database.
Why should I want to resize a database? Upwards – so more power can be understood, but why again downsizing? So I start with the respective reasons for an adjustment of the selected performance class.
What power do I need when?
Let’s take an example… A larger company rents the workspace and is only active in Germany, has an application for the management / booking their meeting rooms or workplaces. This application is used by the ladies at the reception only during the “opening hours” intensively and outside these times occasionally by coworkers. Basically, the receptionists need their application and thus the database only between specific times, for example, 7 – 20 o’clock, the rest of the day the database remains almost unused …
So what is close to making this database “faster” during the day? On-prem is unfortunately not possible since you can not assign a single database so easily further resources.
Another example is evaluations or processing, where operational concerns can vary greatly when the end of the month ends with more computing power in the Azure SQL Database so that the data can be processed and deployed as fast as possible.
- Depending on application usage
- Depending on operational requirements
- nightly processing
- monthly financial statements
- Year-end rally
What do we need for a resize of the Azure SQL Database
- A resource group or its name
- A name for the logical SQL Server (which must be unique)
- A database name
- The new performance level (DTU)
The login to Azure and the selection of to-use Subscription I leave here outside forwards and start the actual script.
Again, I start with the definition of the necessary variables (see above):
# Set the resource group name for your server
$resourcegroupname = "RG-AzureSQLDatabase-Demo"
# Set logical server name
$servername = "server-sqldbdemo"
# The sample database name
$databasename = "db-sqldbdemo"
# Set new performance-level
$newdbDTUsize = "S3"
Now we can resize the Azure SQL Database
This is much easier than rebuilding a database because we need fewer variables (see above) and only one command line for execution. But as I’m careful I also ask if the database exist to ensure that the script does not make any “nonsense”.
# Resize Azure SQL Database to new performance-level
Get-AzureRmSqlDatabase -ResourceGroupName $resourcegroupname -ServerName $servername -DatabaseName $databasename -ev notPresent -ea 0
if ($notPresent) {
    Write-Host $databasename "doesn't exist"
} else {
    Set-AzureRmSqlDatabase -ResourceGroupName $resourcegroupname -ServerName $servername -DatabaseName $databasename -Edition "Standard" -RequestedServiceObjectiveName $newdbDTUsize
}
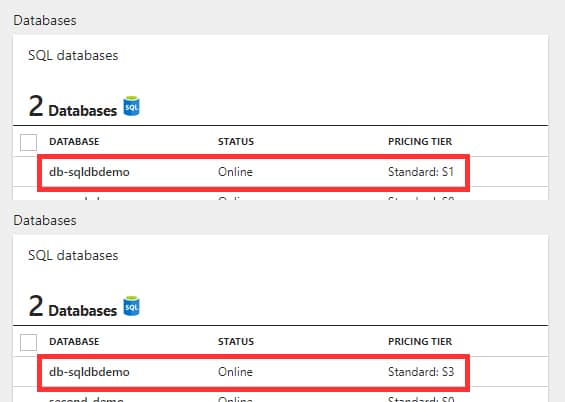
As the before-and-after comparison shows, a resize is possible without problems and lasts only a few moments.
This post might contain affiliate links. We may earn a commission if you click and make a purchase. Your support is appreciated!
Björn continues to work from Mexico as a Senior Consultant – Microsoft Data Platform and Cloud for Kramer&Crew in Cologne. He also remains loyal to the community from his new home, he is involved in Data Saturdays or in various forums. Besides the topics around SQL Server, Powershell and Azure SQL, he is interested in science fiction, baking 😉 and cycling.
Amazon.com Empfehlungen
Damit ich auch meine Kosten für den Blog ein wenig senken kann, verwende ich auf diese Seite das Amazon.com Affiliate Programm, so bekomme ich - falls ihr ein Produkt über meinen Link kauft, eine kleine Provision (ohne zusätzliche Kosten für euch!).
Auto Amazon Links: No products found.
